Happy Friday everyone!!!
I hope you guys had a ton of fun at the
Club Anya blog hop! Wow, I had the absolute best time! And can you say amazing creations!!! I was blown away! I just can't get over how much talent there is out there!
So yesterday Izzy was in total shopping mode! For the last couple of days she has been asking to go shopping and ride in the car. She asked Jason on Wednesday night to take her to the store and to Lowes (no idea why). Well yesterday we were going to meet Jason for lunch and I decided to run some errands as well! Can I tell you how many times she asked to go to Hobby Lobby and Target! OMGoodness it was non stop! LOL! I felt bad for Jason too! Poor thing, I accidentally told her we were going to her favorite place (Target) so I think she was a little disappointed that we went to eat first! LOL! But it worked out okay once she actually saw Jason!
Okay so I know it is Friday and the challenge is called
Watchdoin Wednesday, but it took me awhile to figure out the tutorial part so I am posting it on my blog today! Well this week's challenge over at SUINK was to create a basket either for Easter, mother's day, may day or any special occasion. The one thing we ask is that you share the template you use! Well since I didn't use a template, I had to create a tutorial to describe how I made it! LOL! And since I thought my little basket looked awfully lonely I wanted to create a card to match, so I used this week's
Sketch Challenge at SCS for the layout!
Gift Set

Basket

Card

I want to start by describing how I made the card first. I simply followed the
SCS sketch using blue, dark blue and black card stock along with some DP from Basic Grey. I then punched out some black, blue and light blue card stock using my Labels 4 nesties and stamped the sentiment, dots and swirls from
Thinking of Mother by SUINK and added blue rhinestones on top of the circles. I finished up the card with some twine from Jason's gardening stash. The basket itself is created out of blue and dark blue card stock that I distressed with a sponge and some taken with teal ink following the tutorial below. I then attached the handle with some jumbo eyelets and some more of Jason's twine. I filled the basket with some green confetti and added the little label with some black and dark blue card stock that I cut out with the labels four nesties and then stamped with one of the sentiments.
Basket Tutorial
Step 1: Cut a piece of paper to 9X9 and score vertically at 3" and 6" (I am using bright colors so you can see the steps better)
 Step 2:
 Now score horizontally at 3" and 6".
 Step 3:
 Cut out the four corner pieces you have created with your scoring
 Step 4:
 Now cut the vertical projections into 1" strips. Make sure you do not cut into the center square.
 Step 5:
 Repeat step four for the horizontal projections.
 Step 6:
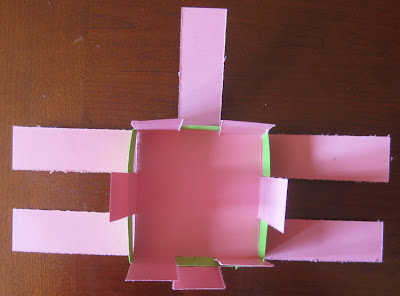
 Now fold all the score lines up leaving the center square as your base.
 Step 7:
 Cut three strips of card stock 1" X 12" and score them each at 1.5", 4.5", 7.5", 10.5". (At this point you can distress the edges if you choose.)
 Step 8:
 Now begins the weaving. Simply decide which side you would like to be your back and place your first strip in the middle of the back and weave around the sides making sure that if you have your strip in front that it is in the back for the next one. Then glue the back.
 Step 9:
 Take your next strip and repeat step eight except alternating strips from the last time. (So if the first strip was in front then this strip needs to be in back). Glue to the back side again.
(inside view)

(front view)
 Step 10:
 Repeat step 8 with your final strip
(inside view)

(front view)
 Step 11:
 For the top cap, cut a strip of paper 3" X 12" and score vertically at .5", 1.5" and 2.5"
 Step 12:
 Score horizontally at 1.5", 4.5", 7.5" and 10.5"
 Step 13:
 Now glue your half inch strips toward the center to create a finished edge.
 Step 14:
 Fold your strip in half and along the other score lines you created.
 Step 15:
 Place your finishing edge over the top and glue to the top.
 Step 16:
 Cut a strip of card stock to 1" X 12" and attach it to your basket with either glue or some eyelets or brads and your basket is complete!

Now it is your turn to try. Simply add the keyword SUINKWWWC36 when uploading your creations to SCS or PCP. And then check out the other awesome creations by the DT.
Speaking of awesomeness!
Pink Cat studio has a great new contest going on right now at the blog! You can win the new
Lily at the Beach release simply by attaching this adorable blinkie to your side bar! Complete details can be found
here!
Thanks everyone for hanging out with me today! Have a great rest of the day! Smiles!