Showing posts with label boxes. Show all posts

Saturday, June 13, 2009

Cutest Little Bundle!

Happy Saturday everyone!

It is the weekend and boy do we have a busy one planned! I finally finished painting the master bedroom and now we are onto the master bath. Lots of molding going up, some new fixtures and the faucet needs to be replaced. And of course tons more painting! I have to say it feels awfully good to have at least one room complete.

Jason has been telling me all this week that he wants to have a camp out with Izzy in the back yard tonight. I personally hate camping so will be sleeping in the comfort of my own bed tonight, but I am really anxious to see how this goes. I have a feeling that he will be bringing Izzy in shortly after they go outside! LOL!

And speaking of Izzy and her Daddy, you should see them together. Last night, she wanted to go outside and all she had to do was take his hand in hers and guide him toward the door! I mean Wow!!!! I have tried that a million times with Jason and he never comes with me! LOL! Oh and she has to be the smartest kid in the world!!!! I mean she can already spell. Well, okay just one word and you don't even have to spell the whole thing before she says it but that should still count right? I know your wondering what my genius little girl knows aren't you! It is I -C - E! Yep, if you spell ice she asks for chocolate ice cream on the couch! GENIUS!!!!!!!!!!! LOL!

Alrighty, I will stop rambling now. I know what you are here for! You are here for day two of the sneak peeks from Club Anya!!! Today's theme is all about babies. I don't know about you but we seem to be in the phase in our life where all our friends are having babies. At first it was everyone getting married and now everyone is having a baby. Well, I didn't want to make just a baby card for my sneak today! So to show off this adorable new set, I decided to create a little gift set that could hold some candy and a gift card! So without further ado, I would like to introduce you to Oh Baby!!!!!!!!


How cute is the hat on the little girl!!!!!!! So, so sweet and this set comes with some great accessories as well, for endless possibilities!!!! I am so, so excited! Well I started off this project by first creating some baby booties out of DP from Making memories. A template can be found here. I then added some rick rack around the bottom and a brad to close the shoe. Using my nesties, I cut out some dark pink and light pink card stock and adhered them to the toe of each shoe. Next I stamped the rattle from Oh Baby by the Greeting Farm on white card stock, colored it in with my copics and a silver pen and cut it out. I then popped each one off the shoe and added some silver stars. For the box, I simply created a 5 X 4 inch box out of pink card stock and then created a matching lid to go with it. (Little tip, make your lid slightly larger than 5 X 4 otherwise you have to go hunt down another piece of card stock and try to salvage the other one. Very annoying, I am just saying! LOL!) I decorated my box with pink and dark pink card stock along with DP from Making Memories. I then stamped the little girl and sentiment from Oh Baby on white card stock and colored them in with my copics. I cut them out using my nesties and popped them off the top of the lid. To complete the lid, I added four buttons in descending size order. I am not sure who I will give it to yet, but at the rate my friends are having kids, I am sure it will come in handy!

Now go forth and check out the rest of the DT!!!!! How awesome were all the creations!!!! And didn't Joni do an excellent job! So glad she has joined our team!
Thanks everyone for stopping by today! Tomorrow is our last day of sneaks leading up to the big release party tomorrow night at 8 p.m. CST!!! Be there or be square! Smiles!

Monday, April 20, 2009

I Jinxed Her and Some Flutterings!

Happy Monday everyone!!!

I hope everyone had a really great weekend! It has been incredibly nasty here! Basically raining all weekend and doing not much else! Poor Izzy keeps wanting to go outside or to the park but it definitely didn't happen this weekend. It pretty much rained the whole time and Jason even had to get out the pump to pump off the water from the cover of the pool since it had rained so much! Of course the minute he stepped outside, Izzy was putting on her shoes to go with him! LOL!

And speaking of Izzy, I painted her fingernails for the first time on Saturday! My baby is becoming a little girl! It was actually quite amusing. She loves when I clip her fingernails but will only let me clip one at a time. I can't seem to get her to stand still long enough. Well yesterday evening she came up to me and asked me for the clippers. Since it had only been a couple of days since I last clipped them, I really didn't have anything to do. I asked her if she wanted me to paint them instead. She of course said please and I was off to hunt down the one bottle of nail polish I own. Because I have never painted her fingernails, I decided to show her what would happen on one of mine. I painted my index finger then told her to give me her hand. The second I pulled the wand out to paint hers, she says, "Ketchup! Ketchup!" It was all I could do not to laugh. Then I painted all her nails and we blew on them until they dried. She was beaming from ear to ear so I told her to go show Daddy. Of course Daddy smiled and ohhed and ahhed over them (it was only later I found out that he was sad because she looked so big, lol!). Then she turns to me and says, "Paper towel? Wash your hands?" Uh, she obviously didn't get the concept that the nail polish stays on. I had to do the rest of my fingers in order to convince her the polish was okay, but she still walked around with her hands out in front of her for the rest of the evening! LOL!!! Ahhh, girls!

Like I said above there wasn't much to do outside this weekend so I was able to get a lot of stamping done inside!! Oh I was so excited!! In fact, I was even able to get a video tutorial completed and posted over at Club Anya!! It is my first copic tutorial and yes I do know I look like a big goober in the first frame! LOL! Now I present to you the finished creation of my tutorial piece. I decided to play along in this week's The Case of The Curious Card Contest over at The Greeting Farm blog! I mean how could I not. My wonderful friend and Club Anya leader, Jessica is the creator of the beautiful card being cased!!!!


I of course couldn't stop at just casing her card! I had to incorporate pink and butterflies, two of her favorite things!! I started my card by stamping Flutter Anya by The Greeting Farm on white card stock and colored her in using my copics. I added lots of sparkle gel pen to make her really shine!!! Following Jess's layout, I layered on brown, light pink and dark pink card stock along with DP from SEI and Bo Bunny. I added a pink and brown stripped ribbon to the top and popped off my image. To finish the card off, I added lots of rhinestone stickers in swirl patterns to make it look like fairy dust! I hope you like it Jess!!!!

My second project for today is to make up for the jinx I placed on my good friend Melissa. I posted a couple weeks ago a gift set I was making for her to give at her baby shower. I was just so, so sure she was going to have a girl so I made this set. Well, you all were right. I jinxed her. I just found out that they are having a boy!!! I am so sorry Melissa! LOL! Actually her and her husband are ecstatic, and can hardly wait for September! So to make up for my snafu, I present to you a thank you card set for a boy!

Gift Set


Card Box holder


Card


I liked the gift set idea so much that I decided to simply switch up the paper and images and stick with the basic concept and layout. I started the set by creating my card box out of brown and green card stock along with some DP from Basic Grey. A complete tutorial can be found here. I then stamped the baby, shirt, and bear hat from Dress Up Sweet Pea from Pink Cat Studio on white card stock and colored him in using my copics. To change the bear hat into an owl (Melissa's theme for the nursery is owls), I simply masked off the ears then drew in the circles around the eyes, the feathers at the side and the mask on the face. For the tag on the box, I stamped, "Boy" from Sweet Pea Plate 2 on his shirt and "Thanks" from Kiki Kitty down the side. I then mounted it on brown and green card stock I cut out with my nesties and attached it to my box with a brown stitched ribbon. For the card, I followed the same procedure to create my little boy as I did for the tag and mounted it on brown and green card stock along with the same DP from Basic Grey. A cuttlebugged a piece of brown card stock with my herringbone embossing folder and then attached a brown and white polka dot ribbon across the middle. I completed the card with two brown buttons and a green one up in the corner. I can only hope this makes up for my jinx!

Well thanks everyone for hanging out with me today!! Don't forget to come back tomorrow for the first day of Pink Cat sneak peeks! Smiles!

Friday, April 17, 2009

A Tisket, A Tasket, A Mother's Day Basket!

Happy Friday everyone!!!

I hope you guys had a ton of fun at the Club Anya blog hop! Wow, I had the absolute best time! And can you say amazing creations!!! I was blown away! I just can't get over how much talent there is out there!

So yesterday Izzy was in total shopping mode! For the last couple of days she has been asking to go shopping and ride in the car. She asked Jason on Wednesday night to take her to the store and to Lowes (no idea why). Well yesterday we were going to meet Jason for lunch and I decided to run some errands as well! Can I tell you how many times she asked to go to Hobby Lobby and Target! OMGoodness it was non stop! LOL! I felt bad for Jason too! Poor thing, I accidentally told her we were going to her favorite place (Target) so I think she was a little disappointed that we went to eat first! LOL! But it worked out okay once she actually saw Jason!

Okay so I know it is Friday and the challenge is called Watchdoin Wednesday, but it took me awhile to figure out the tutorial part so I am posting it on my blog today! Well this week's challenge over at SUINK was to create a basket either for Easter, mother's day, may day or any special occasion. The one thing we ask is that you share the template you use! Well since I didn't use a template, I had to create a tutorial to describe how I made it! LOL! And since I thought my little basket looked awfully lonely I wanted to create a card to match, so I used this week's Sketch Challenge at SCS for the layout!

Gift Set


Basket


Card


I want to start by describing how I made the card first. I simply followed the SCS sketch using blue, dark blue and black card stock along with some DP from Basic Grey. I then punched out some black, blue and light blue card stock using my Labels 4 nesties and stamped the sentiment, dots and swirls from Thinking of Mother by SUINK and added blue rhinestones on top of the circles. I finished up the card with some twine from Jason's gardening stash. The basket itself is created out of blue and dark blue card stock that I distressed with a sponge and some taken with teal ink following the tutorial below. I then attached the handle with some jumbo eyelets and some more of Jason's twine. I filled the basket with some green confetti and added the little label with some black and dark blue card stock that I cut out with the labels four nesties and then stamped with one of the sentiments.

Basket Tutorial

Step 1: Cut a piece of paper to 9X9 and score vertically at 3" and 6" (I am using bright colors so you can see the steps better)


Step 2: Now score horizontally at 3" and 6".


Step 3: Cut out the four corner pieces you have created with your scoring


Step 4: Now cut the vertical projections into 1" strips. Make sure you do not cut into the center square.


Step 5: Repeat step four for the horizontal projections.


Step 6: Now fold all the score lines up leaving the center square as your base.


Step 7: Cut three strips of card stock 1" X 12" and score them each at 1.5", 4.5", 7.5", 10.5". (At this point you can distress the edges if you choose.)


Step 8: Now begins the weaving. Simply decide which side you would like to be your back and place your first strip in the middle of the back and weave around the sides making sure that if you have your strip in front that it is in the back for the next one. Then glue the back.


Step 9: Take your next strip and repeat step eight except alternating strips from the last time. (So if the first strip was in front then this strip needs to be in back). Glue to the back side again.

(inside view)


(front view)


Step 10: Repeat step 8 with your final strip

(inside view)


(front view)


Step 11: For the top cap, cut a strip of paper 3" X 12" and score vertically at .5", 1.5" and 2.5"


Step 12: Score horizontally at 1.5", 4.5", 7.5" and 10.5"


Step 13: Now glue your half inch strips toward the center to create a finished edge.


Step 14: Fold your strip in half and along the other score lines you created.


Step 15: Place your finishing edge over the top and glue to the top.


Step 16: Cut a strip of card stock to 1" X 12" and attach it to your basket with either glue or some eyelets or brads and your basket is complete!


Now it is your turn to try. Simply add the keyword SUINKWWWC36 when uploading your creations to SCS or PCP. And then check out the other awesome creations by the DT.
Speaking of awesomeness! Pink Cat studio has a great new contest going on right now at the blog! You can win the new Lily at the Beach release simply by attaching this adorable blinkie to your side bar! Complete details can be found here!


Thanks everyone for hanging out with me today! Have a great rest of the day! Smiles!

Wednesday, March 11, 2009

Come Outside and Play!

Happy Wednesday!

Hope everyone is having a great week so far! Yesterday was actually a really beautiful day for most of the day. High of almost 80, cloudy but no rain until about 5 o'clock so Izzy and I got a lot of time to play outside. It was so, so much fun! She walked around and around the yard and then she took my hand and we made a couple of laps. Then I got the brilliant idea to rake up some of the sweet gum balls from our back yard. Um I picked up four lawn and leaf bags and am probably only about 1/3 of the way done. Of course I am sure more fell last night after the storm we had. A never ending battle. And sweet little Izzy wanted to help me pick them up. She put on my gloves and then picked each ball up one at a time to put it in the bag. The only problem was she can't really reach the top of the bag so I am the one who actually was putting them in! LOL!

Since we have been playing outside lately so much , I decided to make an outdoor themed card and project. When I saw this week's Try a New Technique challenge over at SCS I knew I had the perfect project. This week's challenge is to make a little treat purse. I decided to go ahead and make a little card to go with it so Izzy can give it to one of her little friends as a thank you after one of their play dates!

Here is the set


Here is the bag closed


Here is the bag open


Here is the little ATC thank you card


Aren't these bags the cutest!! I really think I might make these as my party favors for Izzy's party! And the SUINK play set was perfect for this little gift set! Just loved it!!! Anywhoo, I started this treat box by cutting and assembling my treat purse out of yellow card stock. Directions can be found here. I then used my Martha Stewart zig zag punch to cut out strips of blue card stock and striped DP from Me and My Big Ideas, and attached them to the inside. I stamped the sentiment from Let's Play by SUINK on the inside as well. For the outside, I stamped the two boys going down the slide, also from Let's Play on white card stock and colored them in using my copics. I then mounted it on some more striped DP and blue card stock I cut out with my nesties. To finish the purse, I added black eyelets at the top, threaded through some orange ribbon, tied a bow at the bottom and filled it up with some colorful m and m's.

For the ATC, I started out with a piece of yellow card stock and layered on blue and yellow card stock (the blue I ran through my swiss dots embossing folder) and some more striped DP. I went ahead and ran an orange ribbon around the middle. I stamped the boy on the tricycle from Let's Play by SUINK on white card stock, drew in the sidewalk with my multiliner pen and ruler and then colored it all in with my copics. To finish the card off, I popped off my image that I mounted on yellow and blue card stock and added three green bella baubles down the side! A quick and easy way to say thank you for coming over and playing!

Well that is it for me today! Don't forget it is also Watchadoin' Wednesday over at SUINK and boy is it a fun challenge! I will be sharing my challenge card with you tomorrow. And both the Club Anya and Pink Cat Studio contests are still going on, so get your projects in! Thanks as always for stopping by! I leave you today with a picture of Izzy getting ready to go to Target. I promise, she came up with this outfit on her own!


Smiles!

Wednesday, February 18, 2009

Our Wedding!

Happy Wednesday everyone!!

I hope that this week is going well for you. So far mine has been pretty good. Although I did have a monster headache yesterday and I was really tired again. I think it is the weather. Izzy was super tired yesterday too and took like a 3 hour nap! It was crazy! It was really chilly yesterday and it misted pretty much the whole afternoon. Simply one of those days that you want to curl up under a blanket and sleep! LOL!

Well today I am glad to say I am headache free and I get to babysit Melaina!! Yay!!! I am so excited! I know that Izzy is really looking forward to it. She keeps caring around the shoes that we are giving to Melaina and saying, "Lainy shoes, Lainy shoes." It is really sweet!


So, today is Wednesday which means it is Watchadoin' Wednesday time over at Storage Units, Ink and More!!! And by today's title you can tell that my project is going to be wedding themed! But don't worry I am not going to be showing you old pictures of Jason's and my wedding. Nope I am going to show you a treat box/place card holder for a wedding or shower. Which just so happens to be this week's challenge. All the deets for this week's challenge can be found here. And when I saw this week's Try a New Technique Challenge over at SCS I knew that I had the perfect little favor idea!


So what do you think? I actually cut off the rounded top so I could insert name tags, but I really like the concept. And of course I have always love the idea of a Tiffany Blue and chocolate brown themed wedding. Oh so yummy! So I started this box by first printing off the template found over on SCS on white copy paper and cutting it out. I then attached it to my piece of brown and blue Core'dintations Chocolate Box paper with low tack tape, traced around it and cut it out. I then scored all my folds and taped it together. Next I cut out a piece of the same Core'dinations card stock and adhered a piece of Basic Grey Urban Prairie to the middle and created my belly band. I then tied a white grossgrain ribbon around the box and attached my sentiment tag. The sentiment tag was created by stamping "Our Wedding" from Goin' To the Chapel by Storage Units, Ink and More on white card stock with chocolate chip ink, cutting it out along with some more Core'dinations card stock and placing a silver eyelet at the top. For the place card itself, I printed off my couple's names on white card stock using a fancy font and adhered it to the blue side of the Core'dinations paper and then another piece of the brown side. I stamped on the rings also from the Goin' To the Chapel set in chocolate brown and created a little frame around the edges. To complete the favor, I filled it up with silver wrapped chocolate kisses and attached my card with two silver swirls! I think this would make a really elegant little table setting!

Now it is time to check out the rest of the DT's awesome creations! They will be sure to amaze you! And don't forget we would love you to play along too! When uploading your creation to SCS or PCP just be sure to type in the keyword SUINKWWC28 so that we can all view your wonderful creations.

Now for some Pink Cat news! Did you know that there is a blog candy give away over at the Pink Cat blog!!! You could win the new Enchanted Lily set being released on the 23rd of this month. Here are the deets:

"If you like fairies then I think you are going to love the new Enchanted Lily stamp set that will be released on Feb. 23rd! In the mean time I thought it would be fun to have a contest to help promote the new release.


To be eligible to win you will need to post the above animated blinkie on the side bar of your blog and leave it there until the contest ends. Then please leave a comment in this post stating that you added the blinkie and also include a link to your blog.

Here are instructions on how to add the blinkie to your blog: http://www.pinkcatstudio.com/AddBlinkieToBlog.htm

This contest will end on February 22nd at 5 pm EST and the winner will be announced on the Pink Cat blog on February 23rd. The winner will be randomly chosen from everyone who enters the contest and she will win the new Enchanted Lily stamps."

What are you waiting for!!! Make sure you enter!

Now for my Izzy story. Another quick one. As I mentioned yesterday my lovely daughter just adores wearing Mommy's shoes but not only that, her socks as well. On Sunday Jason decided to go through all the socks that were missing matches. He brought up almost a whole laundry basket full! LOL! Well, as he was laying out socks, Izzy came over to help and pulled out a couple. Next thing we know she is wearing them! And here she is my little sock princess!


Well that is it for me today! I can't wait to have the girls play together! Hope you have a wonderful day and thanks for stopping by! Smiles!

Monday, February 2, 2009

The Bling Bet Bounce!

Happy Tuesday everyone!

Well today is the day! The MFT Bling Bet Bounce and you have now reached the end of the blog hop! If you accidentally wound up here without making the rounds, please start back at Kim's blog to see all the wonderful creations the Design Team has in store for you!

It has been such an honor to be a guest designer for MFT this month and I have a really great project to show you with one of the new releases called Bling' Bet. This stamp set is not just any old alphabet set, but one specially designed to hold 4 mm crystal's or pearls. I have actually used both on my project.

Okay, so I am kind of an obvious person and when I saw this set, I immediately thought the holes looked like polka dots and the polka dots reminded me of babies. So, I created a baby card and a couple of little treat boxes for a baby shower. I used this week's Sketch For You To Try by Jen Del Muro for the layout of the card.

Invitation Card:

Front view of blocks:
Top view of blocks:

Obviously this shower is being thrown for a woman expecting a boy, but the colors could be easily swapped out for a girl! I started this card by stamping the letters from Bling' Bet by MFT on white card stock using barely banana and bashful blue ink. I then cut them out using my nesties and layered them on blue and yellow card stock. I popped them off my background that I created using Jen's sketch and yellow and blue card stock along with some DP from American Craft. I then tied on some yellow ribbon, popped off my letters and added lots of little pearls onto the holes. For the alphabet blocks, I created little square treat boxes out of yellow and blue card stock, stamped my letters again and placed them on the front. I then stamped the sheep, onesie, baby sign and diaper pen from Baby First using my barely banana and bashful blue ink and attached them to the sides. To finish the blocks, I added blue and yellow crystals. I thought it would make a nice little thank you gift!

Now onto the good stuff! It is my privilege to be able to offer up some MFT blog candy! All you need to do is leave a comment on this post to be eligible to win! I will be picking a winner Wednesday Night at the start of the MFT Release Party.

Speaking of the release party here are the deets:

My Favorite Things will be hosting a New Release Cocktail Party on Wednesday night (February 4th) 9-10pm EST EASTERN time. Wed morning will start with a blog hop full of teasers and of course a pot of photopolymer gold at the end!

Then join us Wed night at 9pm EST for a quick chat, as the sets will go live this month at 10pm EST! This month there are THREE new sets being released!

Digital Girl (Who's That Girl set for Feb)
Bling' Bet
Tea For Two

Stop by the release party to win prizes, see some MFTeasers of the new sets and find out how you can become MFT’s next Guest Designer! Thanks everyone for stopping by and I hope to see you there!

Wednesday, January 14, 2009

Pink Cat's Release, Great News and Some Bog Candy!!

Does Thursday get any better than this!!!! I think not!!

Happy Thursday everyone!! Today is the big day! It is Pink Cat's release day! But you know as always you have to bear through a boring family story until you get to the real goodies!!

So today was a kind of laid back day, I played with Izzy in the morning (she wore her new leg warmers). Her and Tuxy fought, she took a nap and then we played some more. Pretty uninteresting day, until she discovered Daddy's Nerds candies. That is all she wants now. I had to hide the box. Those little sugar crumbs are addictive and my poor little baby is hooked. I don't know if she just loves the taste or if it is the fun of eating them. I honestly think it is the fun, because I hardly gave her any and they pretty much lasted all day. It was so cute, she was carrying around this huge bowl with about 10 little Nerds in it and she wouldn't put it down for fear that Tuxy might steal them! LOL! Oh, the joys of being a parent to a daughter and a dog!

Alright, alright, fine I won't leave you in suspense any longer! Here are the new stamp sets that are available for purchase now over at Pink Cat Studio!!!!!


It was worth the wait wasn't it?!!! Aren't they just perfect! The Lily and Billy Sweethearts has so many possibilities for Valentine's Day but also for pretty much any occasion. The new Kiki Kitty set is a must have for all those quick and cute card that you need to make all through out the year. Make sure you hop over to Pink Cat to get yours today!!!

To commemorate the new release, I decide to make another Kiki Card and another Lily card, because, well I just love to stamp and color them up! Here they are!!


See what I mean about being so versatile! For the Kiki card, I stamped Kiki with the cupcake on white card stock and colored her in with my copics. I then mounted her on some Basic Grey DP and blue and red card stock. For the long strip of DP, I actually wove it through the blue DP along with some yellow ribbon I tied into a bow! I then added a felt button and the sentiment I stamped from the new Kiki set. To finish the card off, I added some blue bling and a little bit of swirls to the sentiment and voila, the perfect birthday or thinking of you card!

For my Lily card, I started off by stamping Lily with her hands on her face on some white card stock and then I drew a window around her with my copic multiliner and a ruler. I colored it all in with my copics. I then layered on pink and green card stock along with some Basic Grey DP. I punched out little hearts using a Martha Stewart punch and popped them off around Lily so that it looks like that is what she is thinking about. I finished the card by stamping the sentiment on some white card stock, colored it in with copics and popped it off in the corner. I added three green brads to the top to help balance it out!! I hope you enjoy!

Onto my next big news!!! I was chosen to be a guest designer for the February Release of My Favorite Things!!! I can't believe it! The entries for this month were incredible and I now it was hard decision as there was so many amazing women who applied!! So thank you to all the MFT team for choosing me!! I only hope I can live up to this honor.

Alright onto my last big news of the day and it is a good one!!! Would anyone like some blog candy?!!! Well you first have to sit through my Watchadoin' Wednesday Challenge for SUINK and More before you get to find out!! (I know it is Thursday, but I wanted to honor my candy which comes from SUINK!!!)

This week's challenge was to create a Valentine's Treat holder. Well, on Monday, the wonderful Lynn challenged everyone over at SCS to make an origami box for her Try A New Technique challenge. Well, it took me staring at the computer for an hour, messing up a whole bunch of times and finally watching a video, but I did it, I made one and I am so proud of how it turned out. (Do try this, It took me so long to make it, not because of lack of instructions but rather the user's lack of brains!! LOL!


Here is my holder with my Valentine treat cards!


Here is a picture of the top of the box!


Seriously though, it was simple to make once you tried. I created this origami box by following Lynn's instructions found here. I made the box out of my new Core'dinations Chocolate box paper!!! It was so perfect because one side is brown the other is fuchsia and the core is fuchsia so it matched my paper perfectly. I then made my lid with some light weight chip board and some DP, sorry don't know what kind it is! I decorated the top of the box by cutting out brown, white and pink card stock with my nesties. I stamped the cupid from Will You Be My Valentine by SUInk and More on the white and colored it in with my blender pen and SU! inks. I added some glitter with my glitter pen, went over the bow and arrow with a gold pen and then sponged over the image with pixie pink to distress it. I made a belly band out of fuchsia Core'dinations card stock and my DP and then added my delish Brazill Basics ribbon all around the outside and tied it closed. It is made to hold my Valentine's Day goody notes that I created by embossing some white card stock with a flowers embossing folder, and sponging it with pixie pink. I cut out a piece of white card stock and a piece of brown card stock and stamped the sentiment from Will You Be My Valentine and sponged over it with pixie pink! I think it makes such a great little gift box and could hold just about anything!

So do you like my cupid and sentiment? Would you like to own these adorable images? Well now you can!! Denise, the wonderful owner of SUInk and More has graciously allowed all the DT members the opportunity to give away the stamp set Will You Be My Valentine as blog candy!


Here is what you have to do to win. Simply leave a comment on this post by Sunday, January 18th at midnight CST, telling me what your favorite Valentine was as a kid! I will announce the winner on Monday.

I have to say my favorites were always the ones that had some sort of piece of candy attached, preferably chocolate. However, I would also accept any Valentine that had suckers in them. LOL! Okay so now it is your turn! Can't wait to see what your favorites were!

Thanks for stopping by today and sharing in all my good news! It makes me feel so good to have so many people to share in my joy!

Sunday, January 11, 2009

It's An MFT Extravaganza and a Little Bit of Red, Riding Hood that is!

Happy Sunday everyone!!

I hope that your weekend has a been a good one. Mine certainly has. I stamped most of yesterday and have been able to get a lot accomplished today while spending time with Izzy. She is such a cutie. I have her so well trained! Everytime I show her a card or project she says, "Like It!" and then "Cute"! Oh it is so nice to have a good opinion and compliment at your finger tips! She is such a good girl.

Well, it is Tuxy's turn to be jealous of her today! Everytime Jason or I give her a hug, Tuxy is right there trying to squeeze inbetween. It is totally ridiculous. The really sad thing is that I am sure in a couple of years the two of them are going to be inseparable. I already told Jason to prepare himself that one day Tuxy isn't going to want to sleep with him any more, instead he is going to prefer Izzy!

Okay, well I am going to get to the projects since I have a lot to share today. As you know MFT released their new sets this week (I just received mine in the mail yesterday and I am so excited), and that means it is a weekend of MFT Challenges. Two ambassador challenges and a Guest Designer Challenge. I always try to participate because they are so fun and creative.

Well the First Ambassador Challenge this month was to create a card with some bling on it! All I could think about was how much I wanted to use my new Maid For You set, so that is exactly what I did. I used this week's Sketch Saturday Challenge for the layout.


Alright, so I know this is a little bit sexy, but it is going to my husband for V day so that is okay. I actually stole the idea for the fishnets from Candace who first came up with the idea. I was telling my mom about it and she suggested to make them not only fishnets but stockings with garters! Thanks Mom!! I started this card off by stamping Maid for You from MFT Stamps on white card stock along with several pieces of DP. I then drew on the fishnets with my copic multiliner pen and ruler and then colored the image in with my copics. The rest I paper pieced on. Following the sketch, I layered on black card stock and several different kinds of DP. I stamped the sentiment for the Maid for You set and mounted it on maroon and black and popped it off in the corner. I threaded through a black ribbon and place seven black rhinestones in the bottom left corner. For even more bling, I went over her fishnets with my glitter pen along with the pattern on the ottoman. To finish the card off, I cut out a flower, chopped it up a little to make it look like a feather and glued it on top of the feather duster with a black rhinestone. Sexy and sparkly, gotta love it!

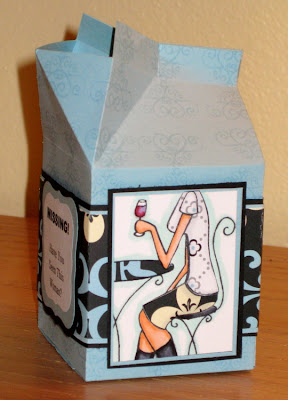
The second MFT Ambassador Challenge was a Milk and Cookies challenge. You could create a milk carton or a project that featured milk or cookies. I opted for the milk carton and of course the first thing I thought of was how they put the missing persons on the milk cartons. And in my sick twisted mind I knew that it would be funny if I used one of the Who's That Girl sets since they don't have heads! Alright, at least I thought it was funny!

Front View:

Side View:

Side View:


See, isn't this a cute idea? The instructions for creating the milk carton can be found here. I first started my carton off by following the tutorial using blue card stock. To achieve the pattern effect on the paper, I stamped the flourish from Meet Me At The Cafe over and over using my versamark pad. I then stamped the main image from Meet Me At the Cafe by MFT on white card stock and several different pieces of DP. I paper pieced them together and then cut the image right down the middle. I created a belly band for my carton using blue card stock, black card stock and DP then mounted my images on the sides with blue and black card stock. I printed the sentiment off on my computer and cut it out along with the blue and black paper using my nesties. I plan on filling it up with milk duds! I hope my friend Tracy thinks it is as funny as I did.

Now for my last MFT card and it was for the MFT Guest Designer Challenge for this month. The challenge was to create a single layer card. Okay, I'll be honest, when I first read this, all I could hear were crickets. I mean nothing was coming to mind. You've seen my work, the more layers the better is my philosophy!!! So how was I going to create a single layer card!!!!! Yikes! Digital papers to the rescue! I used this week's MFT Sketch Challenge for the layout.


This was actually pretty easy once you figure out the sizes and how to make colored boxes. I started this card by opening up a word document and adding two papers from the digital pack Holiday Collection - Light Blue by MFT. I then added and layered on these digi papers along with some red and blue boxes I created in word. I finished the card off by placing a white text box in the middle for the image. I printed the card off on the computer and voila, a single layer card with faux layers. Next I stamped the image Snow Bunny Flopsey by MFT on the card and colored him in with my copics. I added faux snow at the bottom with my copics and liquid applique. I added three red brads to the left corner and three snowflakes to the right. One was a glitter snowflake, the middle was a ghost snowflake that I colored red with my copics and the third was a white snowflake button. I am just so glad I was able to accomplish this! This was really hard for me.

Now a bonus card. This is a card I created for the Anya Fashion Show over at The Greeting Farm, formerly Pink Poison Stamps. I wasn't sure if I was going to like Anya or not until I downloaded one of the digis they offer and now I am in love!!! They color up so cute!! I just love them. I used Jen Del Muro's Sketch For You To Try for the layout.


Isn't she adorable and so easy to color!!! I started this card off by printing off Ridinghood Anya by The Greeting Farm on white card stock and colored her in using my copics and markers. Following the sketch, I mounted her on red and black card stock and layered on red and black card stock along with some coordinating paper. I created a flower for the corner using a ghost flower, red card stock, DP and a black brad. I finished the card off by popping off three blue rhinestone flowers down the side. I just loved the colors and I think I might give it to my friend as a thinking of you gift.

Well, I am finally through. Thanks for bearing with me today. Don't forget the contest is still going on over at Pink Cat Studio and the sneak peeks start tomorrow!!!!! So be sure to come back tomorrow morning and check out what I have in store for you!! Thanks for stopping by and have a great rest of the weekend.