Showing posts with label 3D projects. Show all posts

Monday, June 29, 2009

It's Always a Good Time To Read a Book!

Happy Monday everyone!

Well I am officially exhausted! We just got back from Jason's family reunion yesterday. It was such a great trip hanging out with family and kicking back! We did lots of great things with the kids, but boy was it hot!!!!! The temps were close to 100 everyday and the humidity had to be in the 1000% range! LOL! But it was worth it all to see everyone!

That being said, I have a quick post for you today. Since it is Monday, that means it is Little Paper Shop Monday! I have a fun little gift idea to share with you and a sketch challenge I will be posting later today!

First up is my gift idea which is a simple paperback book cover. I have to admit, I love to read romance novels but sometimes the covers are a little risque, so what better way to hide it than a book cover!


Don't you just love Jena sitting on this book! She is so sweet and cute!!! The apple though sends me over the edge!!! Any hoo, I started this project by making a book cover out of card stock, cardboard and ribbon. If you would like to know the instructions, simply e-mail me and I will forward them. For the cover, I started off by printing {Jena Book} by Little Paper Shop on white card stock and colored her in using my copics. Next I layered on brown, pink and orange card stock along with DP from American crafts. To finish my card off, I added a brown ribbon and three buttons to the top. I actually gave this to my mother-in-law and she loved it! I am so happy!

And for our contest this week we have another great sketch....and we'd love for you to play along! Remember to leave a comment on today's post at the LPS Blog and also use keyword LPSC22 if you're uploading to SCS or PCP :)

The prize this week? Well, since we are ALL about the cupcakes this week at LPS, you can WIN Katie Cupcake! One random winner will be selected from the entries of this week's challenge....good luck!

Thanks everyone for stopping by! Lots of Smiles!

Monday, June 15, 2009

It'a a Secret Garden at Little Paper Shop!

Happy Monday everyone!

Well I have to say I am thoroughly exhausted this morning so I will be keeping it short and sweet!

I am back to preview another set from The Little Paper Shop, and this time, we have an exciting challenge to go along with it!
Introducing: {Garden Gate}! OMGoodness this set is so, so beautiful!!! Not only are there some great garden images you can mix and match but it also has some absolutely beautiful sentiments, sure to touch anyone's heart. This set is like nothing LPS has done before and is SUPER fun to color and embellish.

It's also LPS Monday, and the 15th of the month (the day of our monthly DT challenge), which means we have QUITE the awesome challenge for you, and not only one, but TWO ways to WIN this set!

"The votes are in and the choice for the June DT challenge is TEXTURE. Just think of all that good stuff we have to add a little oomph to our projects - Flower Soft, flock, embossing powder, dry embossing, paper toile, beads, even chunky glitter. If it adds texture, we want to see it!! Thanks ladies. :)"


Aren't the trellis and the bistro set beautiful! And wouldn't you just love to use flower soft on all the flowers! (Another thing I need to add to my list to get!) Anywhoo, I started this card by first stamping the trellis and bistro set from {Garden Gate} by Little Paper Shop on white card stock and colored them in using my copics. I created a diorama card using green and purple card stock along with DP Little Bicycle. Using my nesties I cut out a circle along with the scallop frame. For my texture, I embossed my piece of acetate and the butterflies I punched out. I then placed some rhinestones on the butterfly and placed my sentiment on the top.

What's more? For one week only, beginning with Tuesday's release, BOTH new releases are on sale for 10% off at The Little Paper Shop! (while supplies last)

Be sure to head over to the LPS Blog today to see what the DT has created for this challenge.
You can participate in our DT challenge, issued this month by the FABULOUS Jen, and also leave a comment to be randomly selected, so we'll meet you over at the LPS blog right now for all the fun!

Thanks for stopping by!!! Smiles!

Sunday, May 10, 2009

Welcome Home to SUINK and More!

Happy Sunday again!

This is actually my second post for today so make sure to scroll down for some Club Anya news!

I wanted to come back today and share that SUINK and More has some exciting new products for May!!! Nope not stamps this month but a whole new line of papers and accessories from My Little Shoebox! If you haven't seen this company's products you are definitely in for a treat! They are too fun and colorful and offer a great variety of possibilities! To show off some, I have created three projects! A scrapbook page (yep, pick yourself off the floor, I actually made one! Be kind this was my first attempt! LOL!), a card and a little gift. Since the paper had little houses on it, I thought a housework/housewarming theme would be ideal!

First up is my scrapbook page I created. I decided to pick some of my favorite pictures of Izzy doing "housework duties". Of course I had to include one of Izzy and Jason since they are the ones that spend most of the time in the kitchen!


I started my scrapbook page with a piece of pink card stock cut to 8 X 8. I then layered on a piece of blue card stock and a piece of the My Neighborhood DP by My Little Shoebox available at SUINK. I printed off three of my favorite pictures of Izzy doing housework and mounted them on pink, blue and green card stock. I then added some felt buttons and some real buttons (My Little Shoebox) to each of the corners. I tied a piece of coordinating ribbon from MLS with a charm from Karen Foster. To complete the page, I added the stove from Kiss The Cook by SUINK to the corner and added the word "Housework" that I cut out using my Cricut machine! I am actually proud of this page. It isn't the most beautiful page I have ever seen but it isn't too bad either! LOL!

My card and box go together and I thought they would be a nice little treat to give to a new neighbor. I thought the box could house some freshly baked cookies or some fantastic smelling candles and would be a great house warming gift.


My card I created by first stamping the little girl from Kiss The Cook by SUINK and More on white card stock and colored her in using my copics. To create the floor, I used my copic multiliner pen and a ruler then colored in the checkerboard with my copics. I finished her off by distressing the edges with certainly celery. Next, I layered on green, pink and blue card stock along with several different DPs from My Little Shoebox available at SUINK. To create the wave on the side, I used a new EK Success punch I picked up at Michaels. To complete the card, I added some ribbon and buttons from MLS and tied on another little charm from Karen Foster.

For my coordinating gift, I created a simple box out of some of the new Core'dinations White Wash paper available at SUINK. I filled my box with some of the best smelling little votive candles I found in the dollar bins at Michaels. I then tied it closed with a gingham ribbon from MLS and another charm from Karen Foster. To decorate the outside, I used some of the new MLS paper available at SUINK and mounted it on some pink card stock. I used my Martha Stewart Punch to create the picket fence and popped it off the bottom. The sentiment is stamped from Kiss the Cook by SUINK and mounted on a piece of green card stock. I hope our new neighbors enjoy it!

Thanks for stopping by today and checking out the new product offerings from SUINK and More!!! These will be available in the new revamped store starting this Wednesday, May 13th. And don't forget to check out the rest of the DT's fabulous creations! They are amazing!!!
Smiles!

Tuesday, April 21, 2009

Life's A Beach!

Happy Tuesday everyone!!!!

I hope your week started off well! It rained on and off here yesterday, but we were able to get some good outdoor time in anyway. And boy do I have an Izzy story for you! Wow! That will be at the end of my post because I want to get down to business! Today is the first day of the sneak peeks of the new Lily at the Beach set available this Thursday from Pink Cat Studio!

I don't know about you guys but I am so in the mood for some sunshine and some warm weather. Since summer is fast approaching, this set is perfect for all of those upcoming summer events!

My first project for today features the beautiful Miss Lily holding an innertube. I can not tell you how many times I walked around the lake like this and then jumped in the water! We even used to have contests to see who could get the wettest while still in their tube! Aww to be a kid again! LOL! So I present to you, Lily in an Innertube!


I seriously want to head for the water now! Doesn't she look so happy and warm! Summer come please!!! I started this card by stamping the beautiful innertube Lily from Lily At The Beach by Pink Cat Studio on white card stock and colored her in using my copics. I stamped the innertube again, colored it, cut it out and popped it off. For the scene behind her, I drew in some sand, pebbles and sea life then colored them in with my copics. Following TECC62 by Taylored Expressions, I layered on dark pink, light pink and olive card stock along with some DP from K and Company. For the sentiment, I stamped it from the new Lily At The Beach set, colored it in and cut it out with my nesties. Hopefully this card will put a smile on the face of the person I send it to.

The second stamp I would like to sneak today is little Lily riding on a turtle! I have to tell you I adore turtles and this one is no exception! He is uber cute and little Lily with her hat just melted me when I saw it!

Tote Front


Tote Side View


Close up


Aren't they the cutest!!! Melissa really outdid herself with this one! And for some reason I just desperately wanted to create a little tote for her! When I found these little dollar ceramic planters at Target, I knew what I wanted to do! I started this tote out by first cutting two pieces of card stock 4" X 10.5" and a third piece to 4" X 11". On my 10.5" long pieces, I scored vertically at 5.5 and 7.5. For the 11" long pieces I scored horizontally at 3 and 7 and vertically at .5 and 3.5. I then folded it up and adhered it to the front and back panels I created. (A more detailed tutorial will be posted later in the week). To create the circle at the top, I ran my pieces through my cuttlebug with my nesties! And you have a simple little tote! For the decorated front, I started off by stamping Lily on the turtle from Lily At The Beach by Pink Cat Studio on white card stock and colored her in using my copics. Following this week's sketch for you to try over at Jen Del Muro's I layered on blue, yellow and green card stock along with DP from Stampin' Up. I tied a piece of ribbon around the middle to give it some character, filled it up with my ceramic pot and put in some confetti! I think it would be nice for a little garden party favor.

Now it is time for you to check out the rest of the DT's awesome creations and please help us welcome Tori Wild as our Guest DT this month!!! She really truly is an amazing talent!
Now for my quick Izzy story! Yesterday we went to the park with my neighbor and her kids. It was a nice little break in between the storms but unfortunately the equipment was all wet. Izzy and I were having a wonderful time just walking around when it happened! The worst thing that can possibly ever happen to a kid! SHE SAW A BUNNY!!!!!!!!!!!!!! Are you screaming in terror? Um, yes for some reason my daughter is terrified of bunnies! She literally threw herself on me and wouldn't unbury her face until we left the park! She even had her little hand over one eye so she wouldn't have to see it!! I felt so bad for her, but really it is pretty funny! LOL!

Well thanks for stopping by today! I will have my Twinkling post up later this afternoon! And tomorrow is another day of sneak peeks! Smiles!

Monday, April 20, 2009

I Jinxed Her and Some Flutterings!

Happy Monday everyone!!!

I hope everyone had a really great weekend! It has been incredibly nasty here! Basically raining all weekend and doing not much else! Poor Izzy keeps wanting to go outside or to the park but it definitely didn't happen this weekend. It pretty much rained the whole time and Jason even had to get out the pump to pump off the water from the cover of the pool since it had rained so much! Of course the minute he stepped outside, Izzy was putting on her shoes to go with him! LOL!

And speaking of Izzy, I painted her fingernails for the first time on Saturday! My baby is becoming a little girl! It was actually quite amusing. She loves when I clip her fingernails but will only let me clip one at a time. I can't seem to get her to stand still long enough. Well yesterday evening she came up to me and asked me for the clippers. Since it had only been a couple of days since I last clipped them, I really didn't have anything to do. I asked her if she wanted me to paint them instead. She of course said please and I was off to hunt down the one bottle of nail polish I own. Because I have never painted her fingernails, I decided to show her what would happen on one of mine. I painted my index finger then told her to give me her hand. The second I pulled the wand out to paint hers, she says, "Ketchup! Ketchup!" It was all I could do not to laugh. Then I painted all her nails and we blew on them until they dried. She was beaming from ear to ear so I told her to go show Daddy. Of course Daddy smiled and ohhed and ahhed over them (it was only later I found out that he was sad because she looked so big, lol!). Then she turns to me and says, "Paper towel? Wash your hands?" Uh, she obviously didn't get the concept that the nail polish stays on. I had to do the rest of my fingers in order to convince her the polish was okay, but she still walked around with her hands out in front of her for the rest of the evening! LOL!!! Ahhh, girls!

Like I said above there wasn't much to do outside this weekend so I was able to get a lot of stamping done inside!! Oh I was so excited!! In fact, I was even able to get a video tutorial completed and posted over at Club Anya!! It is my first copic tutorial and yes I do know I look like a big goober in the first frame! LOL! Now I present to you the finished creation of my tutorial piece. I decided to play along in this week's The Case of The Curious Card Contest over at The Greeting Farm blog! I mean how could I not. My wonderful friend and Club Anya leader, Jessica is the creator of the beautiful card being cased!!!!


I of course couldn't stop at just casing her card! I had to incorporate pink and butterflies, two of her favorite things!! I started my card by stamping Flutter Anya by The Greeting Farm on white card stock and colored her in using my copics. I added lots of sparkle gel pen to make her really shine!!! Following Jess's layout, I layered on brown, light pink and dark pink card stock along with DP from SEI and Bo Bunny. I added a pink and brown stripped ribbon to the top and popped off my image. To finish the card off, I added lots of rhinestone stickers in swirl patterns to make it look like fairy dust! I hope you like it Jess!!!!

My second project for today is to make up for the jinx I placed on my good friend Melissa. I posted a couple weeks ago a gift set I was making for her to give at her baby shower. I was just so, so sure she was going to have a girl so I made this set. Well, you all were right. I jinxed her. I just found out that they are having a boy!!! I am so sorry Melissa! LOL! Actually her and her husband are ecstatic, and can hardly wait for September! So to make up for my snafu, I present to you a thank you card set for a boy!

Gift Set


Card Box holder


Card


I liked the gift set idea so much that I decided to simply switch up the paper and images and stick with the basic concept and layout. I started the set by creating my card box out of brown and green card stock along with some DP from Basic Grey. A complete tutorial can be found here. I then stamped the baby, shirt, and bear hat from Dress Up Sweet Pea from Pink Cat Studio on white card stock and colored him in using my copics. To change the bear hat into an owl (Melissa's theme for the nursery is owls), I simply masked off the ears then drew in the circles around the eyes, the feathers at the side and the mask on the face. For the tag on the box, I stamped, "Boy" from Sweet Pea Plate 2 on his shirt and "Thanks" from Kiki Kitty down the side. I then mounted it on brown and green card stock I cut out with my nesties and attached it to my box with a brown stitched ribbon. For the card, I followed the same procedure to create my little boy as I did for the tag and mounted it on brown and green card stock along with the same DP from Basic Grey. A cuttlebugged a piece of brown card stock with my herringbone embossing folder and then attached a brown and white polka dot ribbon across the middle. I completed the card with two brown buttons and a green one up in the corner. I can only hope this makes up for my jinx!

Well thanks everyone for hanging out with me today!! Don't forget to come back tomorrow for the first day of Pink Cat sneak peeks! Smiles!

Friday, April 17, 2009

A Tisket, A Tasket, A Mother's Day Basket!

Happy Friday everyone!!!

I hope you guys had a ton of fun at the Club Anya blog hop! Wow, I had the absolute best time! And can you say amazing creations!!! I was blown away! I just can't get over how much talent there is out there!

So yesterday Izzy was in total shopping mode! For the last couple of days she has been asking to go shopping and ride in the car. She asked Jason on Wednesday night to take her to the store and to Lowes (no idea why). Well yesterday we were going to meet Jason for lunch and I decided to run some errands as well! Can I tell you how many times she asked to go to Hobby Lobby and Target! OMGoodness it was non stop! LOL! I felt bad for Jason too! Poor thing, I accidentally told her we were going to her favorite place (Target) so I think she was a little disappointed that we went to eat first! LOL! But it worked out okay once she actually saw Jason!

Okay so I know it is Friday and the challenge is called Watchdoin Wednesday, but it took me awhile to figure out the tutorial part so I am posting it on my blog today! Well this week's challenge over at SUINK was to create a basket either for Easter, mother's day, may day or any special occasion. The one thing we ask is that you share the template you use! Well since I didn't use a template, I had to create a tutorial to describe how I made it! LOL! And since I thought my little basket looked awfully lonely I wanted to create a card to match, so I used this week's Sketch Challenge at SCS for the layout!

Gift Set


Basket


Card


I want to start by describing how I made the card first. I simply followed the SCS sketch using blue, dark blue and black card stock along with some DP from Basic Grey. I then punched out some black, blue and light blue card stock using my Labels 4 nesties and stamped the sentiment, dots and swirls from Thinking of Mother by SUINK and added blue rhinestones on top of the circles. I finished up the card with some twine from Jason's gardening stash. The basket itself is created out of blue and dark blue card stock that I distressed with a sponge and some taken with teal ink following the tutorial below. I then attached the handle with some jumbo eyelets and some more of Jason's twine. I filled the basket with some green confetti and added the little label with some black and dark blue card stock that I cut out with the labels four nesties and then stamped with one of the sentiments.

Basket Tutorial

Step 1: Cut a piece of paper to 9X9 and score vertically at 3" and 6" (I am using bright colors so you can see the steps better)


Step 2: Now score horizontally at 3" and 6".


Step 3: Cut out the four corner pieces you have created with your scoring


Step 4: Now cut the vertical projections into 1" strips. Make sure you do not cut into the center square.


Step 5: Repeat step four for the horizontal projections.


Step 6: Now fold all the score lines up leaving the center square as your base.


Step 7: Cut three strips of card stock 1" X 12" and score them each at 1.5", 4.5", 7.5", 10.5". (At this point you can distress the edges if you choose.)


Step 8: Now begins the weaving. Simply decide which side you would like to be your back and place your first strip in the middle of the back and weave around the sides making sure that if you have your strip in front that it is in the back for the next one. Then glue the back.
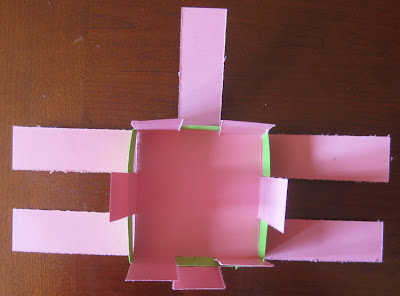

Step 9: Take your next strip and repeat step eight except alternating strips from the last time. (So if the first strip was in front then this strip needs to be in back). Glue to the back side again.

(inside view)


(front view)


Step 10: Repeat step 8 with your final strip

(inside view)


(front view)


Step 11: For the top cap, cut a strip of paper 3" X 12" and score vertically at .5", 1.5" and 2.5"


Step 12: Score horizontally at 1.5", 4.5", 7.5" and 10.5"


Step 13: Now glue your half inch strips toward the center to create a finished edge.


Step 14: Fold your strip in half and along the other score lines you created.


Step 15: Place your finishing edge over the top and glue to the top.


Step 16: Cut a strip of card stock to 1" X 12" and attach it to your basket with either glue or some eyelets or brads and your basket is complete!


Now it is your turn to try. Simply add the keyword SUINKWWWC36 when uploading your creations to SCS or PCP. And then check out the other awesome creations by the DT.
Speaking of awesomeness! Pink Cat studio has a great new contest going on right now at the blog! You can win the new Lily at the Beach release simply by attaching this adorable blinkie to your side bar! Complete details can be found here!


Thanks everyone for hanging out with me today! Have a great rest of the day! Smiles!

Thursday, April 9, 2009

A Baby Thank You!

Happy Friday everyone!

I actually started this post yesterday but ran out of time in the morning to get it posted. So sorry! I don't know what my deal is. I was just telling my friend Jessica last night that I have no mojo for making cards. Shocking I know! All I want to do is color. And let me tell you I have been coloring up a storm! I just counted it up. I have 10 images colored up and 3 cards all of which I can't show yet because they are for upcoming releases. I am hoping that this weekend I will have some card creating inspiration. Otherwise I am going to have to ask people to take my colored images and create cards with them! LOL!

So yesterday, Izzy and I went to my LSS. OMGoodness it has been forever since I have been in there! I am slapping my hand now! I had a great time though. Julie the wonderful owner has asked me to teach a class again in May! I am so so excited. Nervous though too. I am not sure what they want to learn from me but I hope they learn something!

Izzy is so excited about today. Tracy has the day off from work and is coming to spend the afternoon with us and then her friend Lucy will be over this evening. It is all that Izzy has talked about for the last couple of days. It is so cute! Jason is going to the baseball game with Lucy's daddy. I just hope that the game doesn't get rained out. Jason is as excited as a little kid about it so I really hope the weather clears.

I have another quick project for today. Lucy's mom is expecting a little brother or sister for Lucy in September and I am secretly crossing my fingers for a little girl. Although to be honest a boy would be fun too! (I just like the clothes for girls better. LOL!) Well she finds out on Monday and then I can begin planning her shower! I have been thinking for awhile about a great little gift I could give her at the shower that I made and when I saw this card box tutorial at SCS I knew I had the perfect little gift idea. So since it is for a baby of course I reached for my new Sweet Pea Plate #2 from Pink Cat Studio.

Gift set


Card Box


Thank You Card


See what I mean! I really hope she is having a girl! LOL! I wanted to create a gift box that would hold thank you cards for her to send out to people that attend the shower. If she does have a boy though I will just have to make up a boy set!!!! I started this project by first creating my box following the instructions found here. I used pink card stock for the bottom of my box and black for the top. I then covered the lid with a piece of decorative paper from Making Memories. For the card itself, I used pink and black card stock along with some more DP from Making Memories. I cuttlebuged the black paper with my spots and dots folder and placed it on the bottom half of my card. I then tied a polka dot ribbon across the middle and added three buttons to the corner. After I had the bases of my box and card done, I stamped Sweet Pea in the flower pot from Sweet Pea Plate #2 by Pink Cat Studio on white card stock and colored it in using my nesties. For the box lid, I added "Thank You" down the side from Kiki Kitty. I then mounted them both on the pink and black card stock I cut out with nesties. I placed one on my card at an angle and the other I threaded through some polka dot black ribbon to tie my box closed. I will include four cards in the box with the promise to make more if she needs them! Hope she likes it!

Thanks so much for stopping by today. Don't forget the sign up for the blog hop at Club Anya closes on Sunday and we are handing out prizes!!!! It is going to be so, so much fun!!!! Lots of smiles!

Friday, March 13, 2009

Club Anya Gets Wild!!!

Happy Friday everyone!

Hope everyone has had a good week! Izzy and I had a pretty good morning and early afternoon. I had a monster headache all afternoon and pretty much slept the evening away. But in the morning, we slept in a little bit, got around and got bathed then we went out to lunch with Jason!!! It was so much fun! Of course we went to California Pizza Kitchen seeing as how that is Jason's favorite place and right across from his work. I have been assured though that he is pizza'd out, but we will just see! LOL! Then we headed off to Michaels to use my coupon. I can't believe all the new stuff they have. I was like a kid in a candy store! It was so, so much fun! Of course then I laid down the rest of the afternoon, but my sweet little Izzy was so good to me and pretty much took her nap and played by herself so mommy could rest! What a good girl!

Well, onto what you have been waiting for!!! A sneak peek of the new Wild Things Set being released this Sunday by The Greeting Farm!! I am so, so excited. This new stamp set along with a new Anya, Geisha Anya in rubber and two new digital stamps will be released on Sunday at noon after our Guess that Anya Blog Hop so don't miss it!

So, when I first saw this little set of wild things I fell in love with the lion! I just couldn't help myself, his mane is so fun and whimsical and I love how the tufts of hair pointed out. Of course this reminded me of sunflowers, and for some reason that made me think of pinwheels! (I am just trying to explain my reasoning so that you don't' think my project is crazy! LOL!) So that is how I arrived at pinwheels. These little Anya and Ians fit perfectly in the center of my pinwheels and I loved the idea of making them for a kids party! Here we go!!!

Pinwheels


Lion


Bunny


Chicken


Bear


Monkey


Aren't they the cutest!!! How can you not fall in love with that lion! The set also comes with great sentiments to pair up with your creations! I started this project by stamping all five of my little wild things from Wild Things by The Greeting Farm on white card stock, colored them in with my markers and then cut them out with my nesties. I mounted them on yellow and brown card stock that I also cut out with my nesties. To create my pinwheels, I cut out squares of Heidi Grace Designs DP in 5 X 5 in. squares and followed the directions found here. Basically you cut diagonally toward the center about half way on all four corners. Then punch a hole in each corner on the left side and one in the center of your square. Grab a pencil and a thumb tack and stick the thumb tack through the holes, pulling the corners toward the center, and then placing the thumbtack through your center hole and into your pencil eraser. NOTE: If you feel that a thumbtack is too dangerous for the kiddos, simply use a brad, bunch a hole in a straw and thread it through the straw. To finish my project, I simply glued on my wild things to the center! I just love how they look like sunflowers!

Now it is time to check out the other awesome projects the DT has in store for you! Believe me, you don't want to miss them!
Well, my parents and my nieces are coming into town later today to spend the weekend with us so I guess I should go pick up the house! LOL! Actually I am really excited they are coming and so is Izzy! Oh and tomorrow marks another day of sneak peeks from The Greeting Farm so be sure not to miss it! Have a great Friday and thanks as always for stopping by! Smiles!

Wednesday, March 11, 2009

Come Outside and Play!

Happy Wednesday!

Hope everyone is having a great week so far! Yesterday was actually a really beautiful day for most of the day. High of almost 80, cloudy but no rain until about 5 o'clock so Izzy and I got a lot of time to play outside. It was so, so much fun! She walked around and around the yard and then she took my hand and we made a couple of laps. Then I got the brilliant idea to rake up some of the sweet gum balls from our back yard. Um I picked up four lawn and leaf bags and am probably only about 1/3 of the way done. Of course I am sure more fell last night after the storm we had. A never ending battle. And sweet little Izzy wanted to help me pick them up. She put on my gloves and then picked each ball up one at a time to put it in the bag. The only problem was she can't really reach the top of the bag so I am the one who actually was putting them in! LOL!

Since we have been playing outside lately so much , I decided to make an outdoor themed card and project. When I saw this week's Try a New Technique challenge over at SCS I knew I had the perfect project. This week's challenge is to make a little treat purse. I decided to go ahead and make a little card to go with it so Izzy can give it to one of her little friends as a thank you after one of their play dates!

Here is the set


Here is the bag closed


Here is the bag open


Here is the little ATC thank you card


Aren't these bags the cutest!! I really think I might make these as my party favors for Izzy's party! And the SUINK play set was perfect for this little gift set! Just loved it!!! Anywhoo, I started this treat box by cutting and assembling my treat purse out of yellow card stock. Directions can be found here. I then used my Martha Stewart zig zag punch to cut out strips of blue card stock and striped DP from Me and My Big Ideas, and attached them to the inside. I stamped the sentiment from Let's Play by SUINK on the inside as well. For the outside, I stamped the two boys going down the slide, also from Let's Play on white card stock and colored them in using my copics. I then mounted it on some more striped DP and blue card stock I cut out with my nesties. To finish the purse, I added black eyelets at the top, threaded through some orange ribbon, tied a bow at the bottom and filled it up with some colorful m and m's.

For the ATC, I started out with a piece of yellow card stock and layered on blue and yellow card stock (the blue I ran through my swiss dots embossing folder) and some more striped DP. I went ahead and ran an orange ribbon around the middle. I stamped the boy on the tricycle from Let's Play by SUINK on white card stock, drew in the sidewalk with my multiliner pen and ruler and then colored it all in with my copics. To finish the card off, I popped off my image that I mounted on yellow and blue card stock and added three green bella baubles down the side! A quick and easy way to say thank you for coming over and playing!

Well that is it for me today! Don't forget it is also Watchadoin' Wednesday over at SUINK and boy is it a fun challenge! I will be sharing my challenge card with you tomorrow. And both the Club Anya and Pink Cat Studio contests are still going on, so get your projects in! Thanks as always for stopping by! I leave you today with a picture of Izzy getting ready to go to Target. I promise, she came up with this outfit on her own!


Smiles!